Easy Kid-Friendly Spooky Charcuterie Cone Cups for Halloween
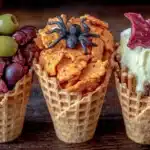
These spooky charcuterie cone cups are perfect for Halloween parties, classroom celebrations, or a fun Friday night movie snack. They’re portable, customizable, and unbelievably adorable, made with waffle cones stuffed with cheese, crackers, fruits, and veggies arranged to look like little monsters.
- Prep Time: 20 minutes
- Cook Time: 0 minutes
- Total Time: 35 minutes
- Yield: 12 servings 1x
- Category: Appetizer
- Cuisine: American
Ingredients
Scale
- 12 waffle cones (flat-bottomed)
- 8 oz cream cheese, softened
- Green food coloring (optional)
- 2 cups cheese cubes (cheddar, mozzarella, or Colby Jack)
- 1 cup pepperoni slices (regular or turkey)
- 1 cup pretzel sticks
- 1 cup red grapes, halved or quartered
- 1 cup baby carrots, cut into thin rounds
- 1/2 cup black olives, sliced
- 1 small package edible googly eyes
- 1/2 cup black licorice strings, cut into 2-inch pieces
- 1/4 cup mini chocolate chips
- 1 orange bell pepper, cut into thin strips
- 3 sticks string cheese, pulled into strips (optional)
- 1/2 cup cherry tomatoes, halved (optional)
- 1 cup ham slices, cut into shapes (optional)
- 1/2 cup cucumber rounds (optional)
Instructions
- Prep your workspace: Set up a muffin tin with 12 waffle cones. Make sure they’re standing straight. If any wobble, add a little ball of foil underneath to level them out.
- Make the monster cream cheese: In a small bowl, mix 8 ounces of softened cream cheese with a few drops of green food coloring. Stir until uniform. Spoon into a piping bag or zip-top bag with a small corner snipped off.
- Pipe the barrier: Pipe a layer of cream cheese into the bottom of each cone, about 1/4 inch thick. Spread it up the sides a little too.
- Prep your fillings: Cut cheese into cubes, slice grapes in half, and use cookie cutters to make fun shapes from pepperoni and ham. Pat everything dry with paper towels.
- Build the base layer: Start with a layer of heavier items at the bottom, like cheese cubes and pretzel sticks.
- Add the spooky elements: Arrange ingredients to look like monster faces. Use two grape halves for eyes (add a tiny dot of cream cheese to hold edible googly eyes on top), a carrot slice for a mouth, and pretzel sticks sticking out for spider legs.
- Finish with details: Add finishing touches. Stick black licorice strings into the sides for spider legs. Sprinkle mini chocolate chips on top for ‘warts’. Add a few edible googly eyes to the outside of the cone.
- Chill before serving: Pop the muffin tin into the refrigerator for 15 minutes.
- Serve: Take the cones out of the muffin tin and arrange them on a platter.
Notes
Assemble cones no more than 2 hours before serving to keep them crispy. Pat all ingredients dry to prevent sogginess. Let kids build their own cones for a fun activity. For a dairy-free version, use dairy-free cream cheese and skip cheese cubes. For gluten-free, use gluten-free waffle cones or tortilla cups.
Nutrition
- Serving Size: 1 cone
- Calories: 200
- Sugar: 7
- Sodium: 350
- Fat: 11
- Saturated Fat: 5
- Carbohydrates: 20
- Fiber: 2
- Protein: 9
Keywords: Halloween, charcuterie, cone cups, kid-friendly, spooky, party snack, no-bake