Spooky Monster Eyeball Sugar Cookies: Best Easy Halloween Recipe
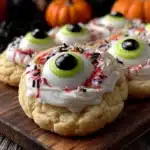
These Spooky Monster Eyeball Sugar Cookies are a classic, buttery sugar cookie base transformed into adorable (and just a little bit creepy) Halloween treats. They are the perfect project for little hands, a guaranteed hit at any Halloween party, and they make for the best lunchbox surprise.
- Prep Time: 15 minutes
- Cook Time: 10 minutes
- Total Time: 1 hour 25 minutes (including chilling and decorating time)
- Yield: 24 servings 1x
- Category: Dessert
- Cuisine: American
Ingredients
Scale
- 1 cup (226g) unsalted butter, softened
- 2 ounces (56g) cream cheese, softened
- 1 cup (200g) granulated sugar
- 1 large egg, at room temperature
- 1 teaspoon vanilla extract
- 2 ½ cups (312g) all-purpose flour
- ½ teaspoon baking powder
- ¼ teaspoon salt
- 2 cups (240g) powdered sugar, sifted
- 2 tablespoons meringue powder
- 3–4 tablespoons water
- Red gel food coloring
- Black gel food coloring
- 1 bag (about 100 pieces) candy eyeballs
Instructions
- Make the cookie dough. In a large bowl, beat the softened butter and cream cheese together until smooth and creamy, about 2 minutes. Add the granulated sugar and beat until light and fluffy, another 2-3 minutes. Scrape down the sides of the bowl. Beat in the egg and vanilla extract until just combined.
- Mix the dry ingredients. In a separate bowl, whisk together the all-purpose flour, baking powder, and salt. Gradually add the dry ingredients to the wet ingredients, mixing on low speed until a soft dough forms. Be careful not to overmix—stop as soon as the flour disappears.
- Chill the dough. Divide the dough in half, flatten each half into a disc, and wrap tightly in plastic wrap. Refrigerate for at least 1 hour, or up to 3 days.
- Preheat and prep. When you’re ready to bake, preheat your oven to 375°F (190°C). Line your baking sheets with parchment paper or silicone mats.
- Roll and cut. On a lightly floured surface, roll out one disc of dough to about ¼-inch thickness. Use your round cookie cutters to cut out as many circles as possible. For the monster mouths, use a small round cutter or a paring knife to cut a crescent shape out of the center of half of the cookies.
- Bake. Place the cookies about 1 inch apart on the prepared baking sheets. Bake for 8-10 minutes, or until the edges are just barely golden. Let them cool on the baking sheet for 5 minutes before transferring to a wire rack to cool completely.
- Prepare the royal icing. In a medium bowl, combine the sifted powdered sugar and meringue powder. Add 3 tablespoons of water and whisk until smooth. The icing should be thick but flowable—think the consistency of honey. Add the remaining tablespoon of water if needed. Cover the bowl with a damp paper towel to prevent the icing from drying out.
- Divide and color. Divide the icing into two bowls. Color one bowl with the red gel food coloring to make a deep, bloody red. Leave the other bowl white. Transfer each color to separate piping bags fitted with a small round tip.
- Decorate the monsters. Using the white icing, pipe a thin outline around the edge of each cookie. Then, flood the inside of the outline with more white icing, using a toothpick to spread it into the corners. While the white icing is still wet, pipe a few red veins radiating out from the center of the cookie. Use a toothpick to gently swirl the red into the white for a bloody effect. Immediately press a candy eyeball into the center of the red veins.
- Add the mouths. For the cookies with the cut-out mouths, use the red icing to pipe a tongue inside the mouth. You can also add a few red drips coming out of the mouth for an extra spooky effect.
- Let the icing set. Allow the decorated cookies to sit at room temperature for at least 2 hours, or overnight, until the icing is completely hard and dry.
Notes
Don’t skip chilling the dough—it prevents spreading. For extra bloodshot eyes, pipe tiny red dots around the candy eyeball before it sets. Let icing dry completely (2-3 hours or overnight) before stacking.
Nutrition
- Serving Size: 1 cookie
- Calories: 180
- Sugar: 18
- Sodium: 75
- Fat: 8
- Saturated Fat: 5
- Carbohydrates: 26
- Protein: 2
Keywords: Halloween cookies, monster cookies, sugar cookies, eyeball cookies, easy Halloween recipe, spooky cookies, kid-friendly baking