There used to be a tiny bakery in our town, Sweet Bones, that made these unbelievable little snack cones for kids’ birthday parties. When they closed their doors two years ago, I honestly felt a little panicked. My kids had grown up on those things—little waffle cones stuffed with cheese, crackers, and fruit, all arranged to look like little monsters. After six tries—some of them pretty disastrous, let me tell you—I finally got it. These Kid-Friendly Spooky Charcuterie Cone Cups for Halloween are my love letter to that bakery.
I’ll never forget the first time I attempted to recreate them. I used regular ice cream cones, and they got soggy within ten minutes. My daughter looked at me and said, “Mom, these are sad ghosts.” Ouch. But that failure taught me exactly what not to do. The key is using sturdy waffle cones and building a barrier between the cone and the fillings. Once I figured that out, everything clicked.
You know that feeling when you find a recipe that just works—no fuss, no stress, and every kid at the party actually eats it? That’s this one. These spooky charcuterie cone cups are perfect for Halloween parties, classroom celebrations, or just a fun Friday night movie snack. They’re portable, customizable, and honestly, they make me look like a Pinterest superstar with almost zero effort. Let me show you how to make them.
Why You’ll Love This Recipe
I’ve tested these Kid-Friendly Spooky Charcuterie Cone Cups for Halloween at three different parties now, and every single time, they disappear faster than candy from a piñata. Here’s why they work so well:
- Quick & Easy: You can assemble a dozen of these in under 20 minutes. No baking, no cooking, no complicated steps. Just chop, arrange, and serve.
- Simple Ingredients: Everything comes from your regular grocery store. No specialty Halloween items needed—just basic cheese, crackers, fruits, and veggies.
- Perfect for Parties: These are ideal for Halloween classroom parties, trunk-or-treat events, or family gatherings. Each cone is a complete serving, so there’s no mess and no sharing required.
- Crowd-Pleaser: I’ve yet to meet a kid who turns these down. Even the picky eaters in my family gobble them up because they get to choose what goes in their cone.
- Unbelievably Adorable: Let’s be honest—the spooky factor is half the fun. These cones look like little monster faces or creepy creatures, and kids absolutely lose their minds over them.
What makes this recipe different from all the other charcuterie boards out there? It’s the cone factor. Instead of a flat board that gets picked over and messy, each kid gets their own personal cone cup. No cross-contamination, no arguments over who ate the last cheese cube, and no soggy crackers from sitting out too long. Plus, the waffle cone adds a sweet crunch that balances the savory fillings perfectly.
This isn’t just another snack idea—it’s the kind of thing that makes you close your eyes after the first bite. It’s comfort food reimagined for little hands, healthier than a bag of candy, but with the same soul-soothing satisfaction. Perfect for impressing other parents without spending hours in the kitchen.
What Ingredients You Will Need
This recipe uses simple, everyday ingredients to create something that looks way more impressive than it actually is. Most of these are pantry staples or easy to find at any grocery store. Here’s what you’ll need:
For the Cones
- Waffle cones (12 cones) – Look for the flat-bottomed waffle cones, not the pointed ones. They stand up better and hold more fillings. I recommend the Keebler brand for their sturdy texture.
- Cream cheese (8 oz, softened) – This creates a barrier between the cone and the fillings, preventing sogginess. Full-fat works best, but low-fat is fine too.
- Green food coloring (optional) – For making “monster cream cheese.” A few drops turn the spread into something spooky.
For the Spooky Fillings

- Cheese cubes (2 cups) – Cheddar, mozzarella, or Colby Jack. Cut into small cubes or use a crinkle cutter for fun shapes. (Adds protein and calcium.)
- Pepperoni slices (1 cup) – Regular or turkey pepperoni. Use a small cookie cutter to make bat or ghost shapes. (Adds savory flavor kids love.)
- Pretzel sticks (1 cup) – These become “witch fingers” or “spider legs.” They add crunch and saltiness.
- Red grapes (1 cup) – Halved or quartered. They look like little eyeballs when placed on cream cheese. (Natural sweetness without added sugar.)
- Baby carrots (1 cup) – Cut into thin rounds. They become “monster teeth” or “jack-o-lantern mouths.”
- Black olives (1/2 cup, sliced) – For making spider bodies or bat wings. Use canned or jarred.
For the Spooky Decorations
- Edible googly eyes (1 small package) – These are candy eyes found in the baking aisle. Wilton brand works great.
- Black licorice strings (1/2 cup, cut into 2-inch pieces) – For making spider legs or worm shapes. Twizzlers Pull-n-Peel works perfectly.
- Mini chocolate chips (1/4 cup) – For adding “warts” or “spots” to your monster creations.
- Orange bell pepper (1, cut into thin strips) – For making pumpkin faces or monster hair.
Optional Add-Ins
- String cheese (3 sticks, pulled into strips) – Looks like mummy wrapping.
- Cherry tomatoes (1/2 cup, halved) – For “bloodshot eyeballs.”
- Ham slices (1 cup, cut into shapes) – Use a cookie cutter for variety.
- Cucumber rounds (1/2 cup) – For making “alien skin” or “scales.”
For substitutions, you can swap cream cheese with Greek yogurt for a lighter option, or use dairy-free cream cheese if needed. If your kids don’t like olives, skip them and use more grapes or cheese instead. The beauty of this recipe is its flexibility—use whatever your family enjoys.
Equipment Needed
You don’t need a fancy kitchen to make these Kid-Friendly Spooky Charcuterie Cone Cups for Halloween. Here’s what I use:
- Waffle cones (12) – Flat-bottomed ones work best. I’ve tried both pointed and flat, and the flat ones stand up so much better.
- Small cookie cutters – Bat, ghost, and pumpkin shapes add instant spookiness. A set from Amazon cost me $8 and I use them every Halloween.
- Piping bag or zip-top bag – For spreading the cream cheese neatly. A zip-top bag with the corner snipped off works perfectly.
- Muffin tin – This is my secret weapon. Place each cone in a muffin cup to keep it upright while you fill it. Genius, right?
- Small bowls – For organizing your fillings. I use ramekins or little prep bowls.
- Cutting board and knife – For prepping fruits, veggies, and cheese.
- Paper towels – Pat dry any wet ingredients like grapes or tomatoes to prevent sogginess.
If you don’t have a muffin tin, you can use a small glass or cup to hold each cone upright. I’ve also used a cardboard egg carton in a pinch—just cut off the lid and poke the cones into the egg cups. Budget-friendly and works like a charm!
Preparation Method
Let me walk you through this step by step. I’ve made these cones at least a dozen times now, so I’ve got all the little tricks figured out.
- Prep your workspace (5 minutes): Set up your muffin tin with 12 waffle cones. Make sure they’re standing straight. If any wobble, add a little ball of foil underneath to level them out. This step saves so much frustration later.
- Make the monster cream cheese (5 minutes): In a small bowl, mix 8 ounces of softened cream cheese with a few drops of green food coloring. Stir until it’s a uniform, spooky green. If you don’t want to use food coloring, leave it white—it still looks great. Spoon this into a piping bag or a zip-top bag with a small corner snipped off.
- Pipe the barrier (3 minutes): Pipe a layer of cream cheese into the bottom of each cone, about 1/4 inch thick. Spread it up the sides a little too. This is the secret to preventing soggy cones. I learned this the hard way after my first batch turned into mushy disasters.
- Prep your fillings (10 minutes): While the cream cheese sets, cut your cheese into cubes, slice your grapes in half, and use your cookie cutters to make fun shapes from the pepperoni and ham. Pat everything dry with paper towels—wet ingredients are the enemy of crispy cones.
- Build the base layer (5 minutes): Start with a layer of heavier items at the bottom. I like to put a few cheese cubes and some pretzel sticks first. This creates a stable foundation for the rest of the fillings.
- Add the spooky elements (10 minutes): This is where the fun happens. Arrange your ingredients to look like monster faces. Use two grape halves for eyes (add a tiny dot of cream cheese to hold edible googly eyes on top), a carrot slice for a mouth, and pretzel sticks sticking out for spider legs. Get creative—my son made a “cyclops” with one big olive in the center.
- Finish with details (5 minutes): Add the finishing touches. Stick black licorice strings into the sides for spider legs. Sprinkle mini chocolate chips on top for “warts.” Add a few edible googly eyes to the outside of the cone for extra spookiness.
- Chill before serving (15 minutes): Pop the muffin tin into the refrigerator for 15 minutes. This helps everything set and keeps the cone crisp. I usually do this step while I’m setting up the rest of the party food.
- Serve and watch them disappear: Take the cones out of the muffin tin and arrange them on a platter. I like to put them in a circle with a bowl of extra dip in the center. Watch kids grab them within seconds.
One thing I always tell people: don’t overstuff the cones. Leave about half an inch of space at the top so kids can see what’s inside. It looks more inviting and keeps everything from falling out.
Cooking Tips & Techniques
After making these Kid-Friendly Spooky Charcuterie Cone Cups for Halloween more times than I can count, I’ve picked up a few tricks that make a real difference.
The soggy cone struggle is real. My first batch turned into sad, limp messes within 20 minutes. The solution? That cream cheese barrier I mentioned earlier. It’s non-negotiable. Also, pat every single ingredient dry before putting it in the cone. Wet grapes and tomatoes are the main culprits. I learned to rinse them the night before and let them air dry in the fridge.
Timing is everything. Assemble these no more than two hours before serving. Any longer and the cones start to soften. If you’re making them for a party, prep all your fillings the night before and store them in separate containers in the fridge. Then assemble right before guests arrive. This way, everything stays fresh and crunchy.
Let kids help. I’ve made the mistake of trying to do everything myself, and honestly, it’s way more fun when the kids get involved. Set up a “spooky cone bar” with all the fillings in little bowls and let each kid build their own. It’s a great activity for Halloween parties and takes the pressure off you. Plus, kids are way more likely to eat something they made themselves.
Use the muffin tin trick. Seriously, this is the best tip I can give you. Without it, the cones tip over constantly and you’ll want to pull your hair out. A standard 12-cup muffin tin holds them perfectly. If you’re making more than 12, use two tins or work in batches.
Don’t skip the chilling step. I know you’re eager to serve them, but those 15 minutes in the fridge make a huge difference. It firms up the cream cheese and helps everything stay in place. Your cones will look so much more professional.
Variations & Adaptations
One of the best things about these Kid-Friendly Spooky Charcuterie Cone Cups for Halloween is how adaptable they are. I’ve tried several variations, and they all turned out great.
Dairy-Free Version: Use dairy-free cream cheese (I like Kite Hill brand) and skip the cheese cubes. Add extra veggies and fruits instead. My friend’s daughter has a dairy allergy, and she loved the version with hummus as the base layer instead of cream cheese. It’s just as creamy and adds a savory kick.
Gluten-Free Option: Waffle cones typically contain gluten, but you can use gluten-free waffle cones (I’ve found them at Whole Foods) or swap them for gluten-free tortilla cups. Just shape the tortillas into cones using a cone mold and bake them until crispy. It takes a little more work, but it’s totally doable.
Sweet vs. Savory: For a dessert version, fill the cones with yogurt, berries, and chocolate chips. Skip the cheese and pepperoni. My kids actually prefer this version for after-school snacks. For a savory version, stick with the recipe as written or add cubed salami and pickles for older kids.
Seasonal Twists: In the fall, add small candy pumpkins or candy corn. For Christmas, use red and green bell pepper strips and star-shaped cheese. This recipe is basically a template you can adapt for any holiday. I’ve made “Easter egg cones” with pastel-colored cream cheese and jelly beans.
Allergen-Friendly: If you’re serving kids with nut allergies, skip any nut-containing ingredients and double-check your food coloring labels. Most are nut-free, but it’s worth verifying. For egg allergies, avoid any fillings with eggs (like egg salad) and stick with cheese and veggies.
My personal favorite variation? I made a “mummy” version by wrapping string cheese strips around the cone and adding two edible eyes at the top. It looked ridiculous and adorable, and the kids couldn’t stop giggling.
Serving & Storage Suggestions
These cones are best served cold or at room temperature, straight from the fridge. I like to arrange them on a large platter with a few extra decorations—fake spider webs, plastic spiders, or little pumpkins around the edges. It makes the presentation even more festive.
What to serve with them: These cones are a complete snack on their own, but they pair beautifully with a warm bowl of soup or chili for a full meal. For parties, I set them out alongside a veggie tray and some Halloween-themed cupcakes. They also go great with apple cider or hot chocolate.
Storage: If you have leftovers (which honestly never happens at my house), you can store them in the refrigerator for up to 24 hours. But here’s the thing—the cones will soften overnight. They’re still edible, just not as crispy. To refresh them, you can try toasting them in a 300°F oven for 5 minutes, but honestly, they’re best eaten the same day.
Reheating: Don’t microwave these. The cone will get soggy and the cheese will melt into a mess. If you want to serve them warm, assemble them without the cream cheese barrier and bake the filled cones at 350°F for 5-7 minutes. The cheese will melt slightly and the cone will stay crispy. I’ve done this for a “warm spooky snack” option, and it’s surprisingly good.
Flavor development: These cones don’t really improve with time—they’re meant to be eaten fresh. The cream cheese softens and the cone loses its crunch after a few hours. So plan to serve them within two hours of assembling for the best experience.
Nutritional Information & Benefits
Each Kid-Friendly Spooky Charcuterie Cone Cup for Halloween (using the recipe as written) contains approximately:
- Calories: 180-220 per cone (depending on fillings)
- Protein: 8-10 grams
- Carbohydrates: 18-22 grams
- Fat: 10-12 grams
- Fiber: 2-3 grams
- Sugar: 6-8 grams (mostly from fruit)
These cones offer a decent balance of protein from the cheese and pepperoni, healthy carbohydrates from the fruit and veggies, and a little bit of fat to keep kids satisfied. Compared to a typical Halloween candy haul, these are a nutritional win. They provide vitamins A and C from the carrots and bell peppers, calcium from the cheese, and antioxidants from the grapes.
For dietary considerations, this recipe can easily be made gluten-free (with gluten-free cones), dairy-free (with dairy-free cream cheese and cheese alternatives), and nut-free (as written). The main allergens to watch for are dairy and gluten, depending on your choices.
I personally love that my kids are getting real food at a Halloween party instead of just sugar. Don’t get me wrong—I let them have candy too. But starting with these cones means they fill up on something nutritious first, and then they’re less likely to overdo it on the sweets. Win-win in my book.
Conclusion
These Kid-Friendly Spooky Charcuterie Cone Cups for Halloween have become a tradition in our house, and I honestly can’t imagine a Halloween party without them. They’re fun, they’re easy, and they make even the pickiest eaters excited about snack time. Plus, they bring back such good memories of that little bakery and the joy it brought my kids.
I’d love for you to try these and make them your own. Maybe you’ll add different fillings, or use a different color cream cheese, or come up with a monster design I’ve never thought of. That’s the beauty of this recipe—it’s a starting point, not a rulebook. Your kids will probably come up with ideas way better than mine anyway.
If you make these, please come back and let me know how they turned out. Leave a comment below or tag me in your photos. I seriously love seeing what other families create. And if you have a picky eater who surprised you by eating something new, tell me about that too. Those are my favorite stories.
Until next time, happy Halloween and happy snacking. You’ve got this!
Frequently Asked Questions
Can I make these cones ahead of time for a party?
You can prep all the fillings up to 24 hours in advance and store them in separate containers in the fridge. But assemble the cones no more than 2 hours before serving to keep them crispy. The cream cheese barrier helps, but the cones will still soften over time.
What if I can’t find waffle cones at my store?
No problem! You can use sugar cones, but they’re smaller and more fragile. Alternatively, use small paper cups or even ice cream cones. For a healthier option, try using bell pepper halves or hollowed-out cucumber boats as the “cone.”
How do I keep the cones from tipping over?
Use a muffin tin! Place each cone in a muffin cup and it will stand perfectly upright. If you don’t have a muffin tin, use small glasses or even a cardboard egg carton with the top cut off. Just make sure the cones are stable before you start filling them.
My kid is a super picky eater. Will they like these?
Probably yes! The key is letting them build their own cone. Set up a “spooky cone bar” with lots of options and let them choose what goes in. Kids are way more likely to eat something they assembled themselves. Even my pickiest eater loved making a “one-eyed monster” with just cheese and grapes.
Can I use these for a classroom party without making a mess?
Absolutely! These are actually perfect for classroom parties because each cone is self-contained. No plates needed, no sharing, and minimal mess. Just make sure the cones are sturdy and don’t overfill them. I’ve sent these to school parties dozens of times with zero complaints from teachers.
Pin This Recipe!
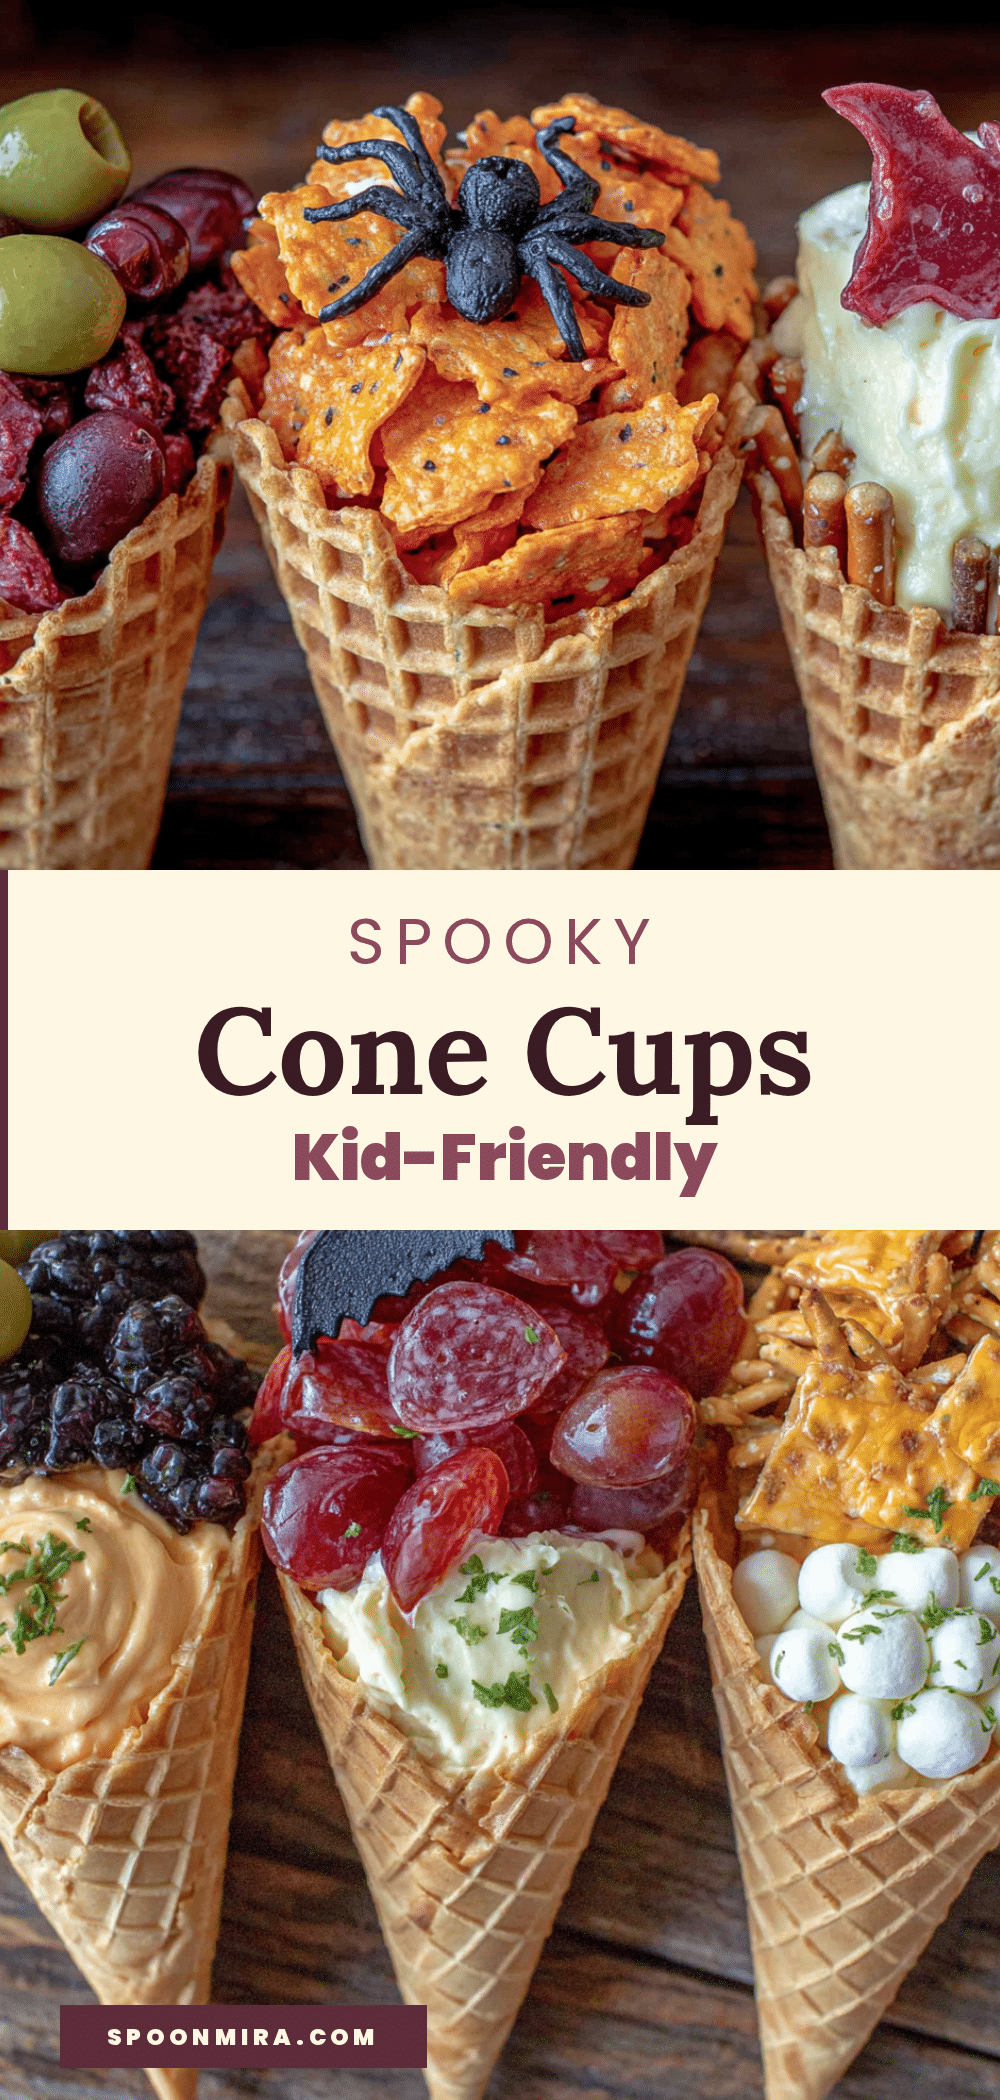
Easy Kid-Friendly Spooky Charcuterie Cone Cups for Halloween
These spooky charcuterie cone cups are perfect for Halloween parties, classroom celebrations, or a fun Friday night movie snack. They’re portable, customizable, and unbelievably adorable, made with waffle cones stuffed with cheese, crackers, fruits, and veggies arranged to look like little monsters.
- Prep Time: 20 minutes
- Cook Time: 0 minutes
- Total Time: 35 minutes
- Yield: 12 servings 1x
- Category: Appetizer
- Cuisine: American
Ingredients
- 12 waffle cones (flat-bottomed)
- 8 oz cream cheese, softened
- Green food coloring (optional)
- 2 cups cheese cubes (cheddar, mozzarella, or Colby Jack)
- 1 cup pepperoni slices (regular or turkey)
- 1 cup pretzel sticks
- 1 cup red grapes, halved or quartered
- 1 cup baby carrots, cut into thin rounds
- 1/2 cup black olives, sliced
- 1 small package edible googly eyes
- 1/2 cup black licorice strings, cut into 2-inch pieces
- 1/4 cup mini chocolate chips
- 1 orange bell pepper, cut into thin strips
- 3 sticks string cheese, pulled into strips (optional)
- 1/2 cup cherry tomatoes, halved (optional)
- 1 cup ham slices, cut into shapes (optional)
- 1/2 cup cucumber rounds (optional)
Instructions
- Prep your workspace: Set up a muffin tin with 12 waffle cones. Make sure they’re standing straight. If any wobble, add a little ball of foil underneath to level them out.
- Make the monster cream cheese: In a small bowl, mix 8 ounces of softened cream cheese with a few drops of green food coloring. Stir until uniform. Spoon into a piping bag or zip-top bag with a small corner snipped off.
- Pipe the barrier: Pipe a layer of cream cheese into the bottom of each cone, about 1/4 inch thick. Spread it up the sides a little too.
- Prep your fillings: Cut cheese into cubes, slice grapes in half, and use cookie cutters to make fun shapes from pepperoni and ham. Pat everything dry with paper towels.
- Build the base layer: Start with a layer of heavier items at the bottom, like cheese cubes and pretzel sticks.
- Add the spooky elements: Arrange ingredients to look like monster faces. Use two grape halves for eyes (add a tiny dot of cream cheese to hold edible googly eyes on top), a carrot slice for a mouth, and pretzel sticks sticking out for spider legs.
- Finish with details: Add finishing touches. Stick black licorice strings into the sides for spider legs. Sprinkle mini chocolate chips on top for ‘warts’. Add a few edible googly eyes to the outside of the cone.
- Chill before serving: Pop the muffin tin into the refrigerator for 15 minutes.
- Serve: Take the cones out of the muffin tin and arrange them on a platter.
Notes
Assemble cones no more than 2 hours before serving to keep them crispy. Pat all ingredients dry to prevent sogginess. Let kids build their own cones for a fun activity. For a dairy-free version, use dairy-free cream cheese and skip cheese cubes. For gluten-free, use gluten-free waffle cones or tortilla cups.
Nutrition
- Serving Size: 1 cone
- Calories: 200
- Sugar: 7
- Sodium: 350
- Fat: 11
- Saturated Fat: 5
- Carbohydrates: 20
- Fiber: 2
- Protein: 9
Keywords: Halloween, charcuterie, cone cups, kid-friendly, spooky, party snack, no-bake


